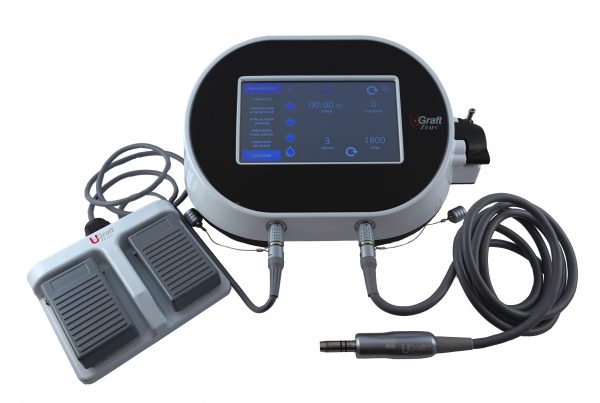
In an office-clinic setting, the most ideal place to set up and assemble the Dr.UGraft ™ hair transplant system is on a mobile cabinet. As a second option, a regular table would also be suitable.
It is most ideal to set up and assemble the Dr.UGraft system components on a mobile cabinet, as shown here.Connecting the Foot Pedal to the Dr.UGraft ™ Console
- Connect the foot-pedal to the bigger-sized port on the right side of the console
- On the floor, position the foot pedal in the region where the operator’s foot would be during the actual surgery
Attaching the Hand Piece to the Dr.UGraft ™ Console
- Next, remove the hand piece and power cord from the sterilization pouch.
- Connect the hand piece to the port on the right side of the console which has a red dot at the 12:00 position. The red dot on the hand piece cord should align with the red dot on the port. Push it through until you hear a snap.
- Place the hand piece on the port to the left-side of the console.
Connecting the Power Cord to the Dr.UGraft ™ Console
- Connect the power cord. You can select either the 110V unit adapter or the 120V unit adapter.
- Place the console end of the power cord in the tiny port on the left-hand side of the console. Connect the wall-end of the power cord to a power source
How to Set Up and Assemble the Dr.UGraft™ Hair Transplant System – Instructions For Putting the Fluid System Together
- Assemble the fluid system. This will require the physiologic fluid-bag and the Dr.UGraft™ tubing which has already been pre-sterilized before placed in its package. Connect the tubing to the bag. This process is the same as connecting an IV bag for administering IV fluid.
- Close the tubing valve in order to prevent the accidental spilling of the fluid.
- Connect the fluid system to the console
- Position the following components as such. When facing the console as the operator, the bag should be on the left side, the console in the center and the hand piece on the right side. This arrangement assures that the fluid flows from the bag to the hand piece.
- With the physiologic fluid bag on the left, thread the largest part of the fluid tube through the fluid pump system on the back of the console. You do so by snapping the pump hood to open it.
- Thread the larger part of the tube through the pump and snap the pump hood closed to secure the tubing in place.
- Connect the fluid tubing to the hand piece by threading it through a tunnel in the mid-section of the hand piece. Push the opening through to the port. Now the fluid system is integrated fully into the hand piece.
Inserting the Dr.UGraft ™ Flared Hybrid Punch Into the Handpiece
- Now insert the flared hybrid punch into the hand piece. First remove the punch from the sterilization bag and push it up the mobile collar at the end of the hand piece. Push it all the way up to at least the ball bearing
- Hold the punch to the hand piece colette. Put the punch into the colette while pushing up the collar until it snaps. This should be very easy. Then pull back the collar until you hear a click that indicates that the punch has been correctly inserted.
Video: How to Set Up and Assemble the Dr.UGraft ™ System
Besides reading the set up instructions, learn how to assemble the components of the Dr.UGraft ™ system by watching this video.
What’s Next
Now that you know how to set up and assemble the Dr.UGraft ™ components, learn how to operate the foot pedal and operate system by calibrating it and selecting the right speed and strength settings for the punch.
Read the complete online instructional guide for the Dr.UGraft ™ hair transplant system here


